A DIY retaining wall project could add an astounding element to your landscaping. They increase functionality, improves aesthetics and ultimately boosts the value of your property.
Tiered gardens, terraces, built-in seating, raised patios and sunken fireplaces are all possible with a sturdy, reliable retaining wall. Here are some factors you should consider when deciding on the right retaining solution for you.
Do I need Council approval?
Different zones have different requirements. It’s best to check with your local council prior to construction of your DIY retaining wall to ascertain if approval or building permits are required.
You can find your local government in these handy directories:
NSW – QLD – VIC – NT – SA – WA – TAS – ACT
Do I have a cut site or a fill site?
A cut site is when you are cutting into the natural slope of the land to create a stepped site with your wall. A fill site is when you install the wall at the lowest part of a gradual slope and then fill to level it with the highest part. Different sites will require slightly different procedures and equipment for your retaining wall.
(source)
What kind of soil am I working with?
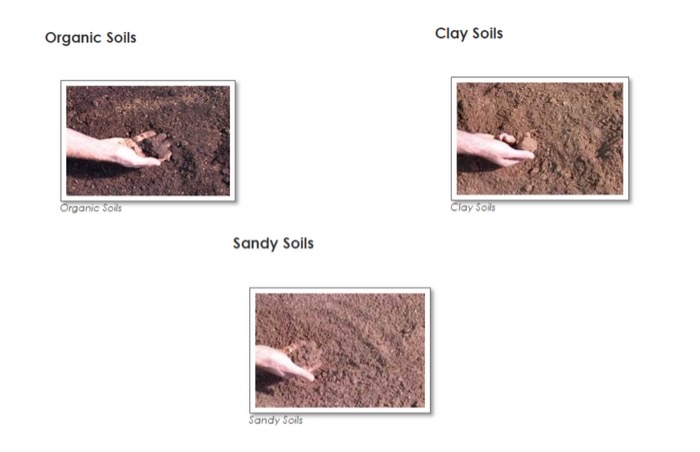
To test the soil at the site, take a handful from at least 300mm below the surface and squeeze.
- Organic soils will stick together but won’t hold. You should only use as top soil, not to build the wall itself.
- Clay soils will form a ball. They retain moisture and add pressure behind walls, so they may require you to add additional reinforcement, but can still be used in your project.
- Sandy soils won’t stick at all. They are granular and allow for good drainage, making them ideal for your retaining wall.
Do I need to compact my soil?
You should only be compacting soil away from the zone of influence. It should not be compacted against the retaining wall itself, or in any way that could affect the back fill or drainage capabilities. Fill sites would generally require you to compact the soil to stabilise the fill. However, cut sites generally will not, as you are excavating through already stable soil.
Do I need any specific equipment/machinery?
The equipment/machinery you need will depend on the type and purpose of your DIY retaining wall project and which kind of site you have.
For instance, a fill site will probably need compacting to stabilise the soil. Because of this you will need a plate compactor/vibrating plate. Whereas a cut site may require you to have an excavator if it’s a significant size. If the wall is high and uses heavy materials, consider plant hire to lift and stack the wall materials to avoid injury or unsafe labour practices.
How do I measure my site?
You should create a detailed site plan, drawn to scale.This will be useful when estimating and calculating the materials you’ll need. Measure length and height of your proposed retaining wall, and how much weight it will need to retain. This will help determine the most appropriate retaining solution, and the measurements of materials needed.
Once you’re ready to install your retaining wall, clear the area and prepare your site. You should use stakes to and spirit-levelled string lines as a guide that matches your site plan measurements.
Why is waterproofing important?
Timber will be more susceptible to water damage than cement. However, whichever material you choose should still be waterproofed before backfilling, to increase material longevity. You should use a commercial waterproofing or bituminous product such as SikaTite BE, to ‘paint’ the underground portion of the material. Then, use a commercial grade polyurethane sealant, such as Sikaflex Pro, to seal any gaps or crevices.
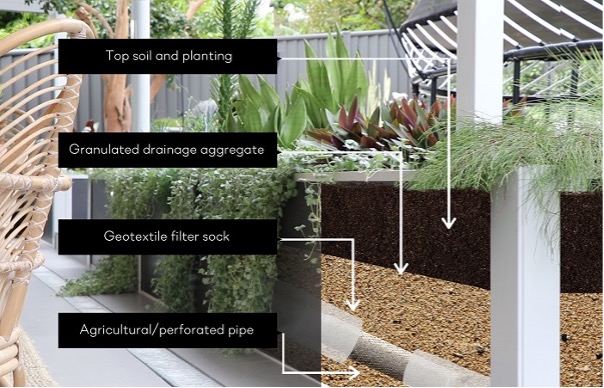
How do I correctly backfill my wall?
Drainage is highly important. Trapped moisture can lead to irreversible damage and a premature weakening of your wall.
At the base of your wall, before backfilling, lay an agricultural line or pipe to allow release of underground seepage. Ensure you also line it with an external filter sock to prevent silt from entering and clogging it. This pipe should exit at the sides where it can run off; you should avoid cutting into your wall to fit the pipe though, as it can undermine the strength of the wall.
You should also use backfill that’s granulated to allow for adequate drainage; denser soils that hold moisture will add dangerous pressure to the wall.
Is angling or stepping back my wall important?
Whether you install your wall straight or at a slight angle/step depends on how high the wall is. Gravity works against a wall that is exactly perpendicular to ground level, and this pressure is mostly directed at the lower part of the wall.
To get gravity working with you, ensure your materials are at a very slight angle; basically, the bottom of the wall should be slightly more outward than the top. However, if your wall is only a very small height – for a low garden bed, say – it isn’t an issue you really need to worry about.